Welcome to the 3rd and final part of the DIY Culottes tutorial! See Part 1 - Drafting the Pattern here, and Part 2 - Cutting here. In this post we get into the real meat of the project, sewing it all together! Lets get started!
STEP 1) Gather Supplies
Today you will need:
-paper pattern pieces (for reference)
-fabric pieces
-scissors
-iron
-pins
-sewing machine
-needle
-thread
-button or other closure of your choice (see Step 10 for discussion)
-paper pattern pieces (for reference)
-fabric pieces
-scissors
-iron
-pins
-sewing machine
-needle
-thread
-button or other closure of your choice (see Step 10 for discussion)
STEP 2) Attach Pockets
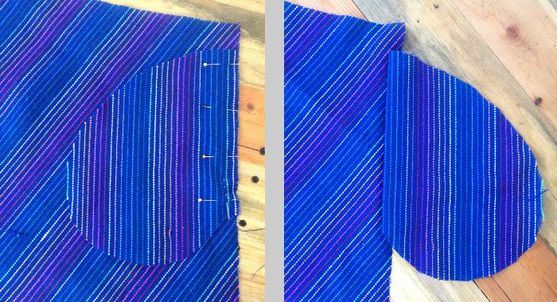
Align each pocket piece with each leg piece at the side seam. The pocket edges should overlap the pocket placement notches by ⅜" on each side (seam allowance). Pin in place, right sides together. Stitch in place ⅜" from edge. (From here on, all stitching will occur ⅜" from edge unless otherwise noted.) Clean finish the seam allowance edges from the bottom of the pocket to the waist with overlock or zigzag. No need to clean finish below the pocket, as you will be doing that later. After stitching, open the pocket away from the leg and press with your iron.
STEP 3) Stitch the Side Seams
Pin the front leg to the back leg along the side seam, right sides together. Pin around the pocket. Stitch together, being careful to be neat and properly aligned at the pocket opening area. Stitch along the edge with overlock/zigzag.

STEP 4) Stitch the Rise Seams
Pin along your front or back rise seams (the one without the fly), right sides together. Stitch. Overlock/zigzag the edge. Press the seam allowance to the wearer's right.

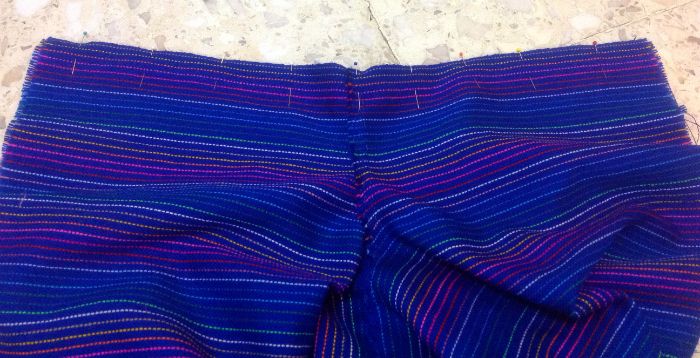
Now pin the rise seam that has the fly, right sides together. Your stitching should stop at the bottom of your opening. Check your paper pattern if you do not remember where that is… it should marked with a notch. Mine is 3 ½" below the waistline. Accounting for seam allowance, measure down from the waist edge (for me it is 3 ½" + ⅜" = 3 ⅞") and mark with a pin. This is where your stitching will stop. Overlock/zigzag the edge from the bottom of the fly to the leg. Press the seam allowance to the wearer's right.

The cross pins mark the bottom of my fly opening, where I will stop stitching.
STEP 5) Construct the Fly
Overlock/zigzag the vertical edges of both fly pieces. Overlock/zigzag the bottom of the half-fly piece, which should be on the wearer's left, whether you placed your fly at the front or the back. Don't worry if yours is on the opposite side... you will just have a non-traditional opening direction. Kudos for not conforming to gender rules!
Pro-Tip: An easy and sexist but funny way to remember which way men's and women's garments should open is to imagine a husband and wife in the car (or better yet, the covered wagon). The man is driving, obviously, as we all know women can't properly handle such heavy machinery. Anyway, all of the clothing they are wearing opens towards each other, so that it is easy to slide a hand into the spouses shirt, dress, etc. Nice visual, huh? An interesting exception is that women's jeans usually open in the men's fashion.
Fold the half-fly piece back, folding straight up from the rise seam. Pin in place. Stitch from the waist line down along the folded edge to 1/2" (or so) past the bottom of the opening. Turn and stitch away from the opening, following the angle of the bottom of the fly. Then stitch straight up to the waistline, 1 1/4" (or so) from the folded edge.

The red string indicates where the stitching should be.
On the other side, fold the full fly back along the center, lining up the angled edges. Overlock/zigzag together along the angled edge.

Run a straight stitch down the middle of the fly, about 1 1/2" from the folded edge.
Turn your garment to the right side and fully close the fly. Pin in place. Run a single stitch along the same angled stitch you made earlier, but this time stitching through all layers. Take all pins out and press. Now your fly is complete!
Turn your garment to the right side and fully close the fly. Pin in place. Run a single stitch along the same angled stitch you made earlier, but this time stitching through all layers. Take all pins out and press. Now your fly is complete!
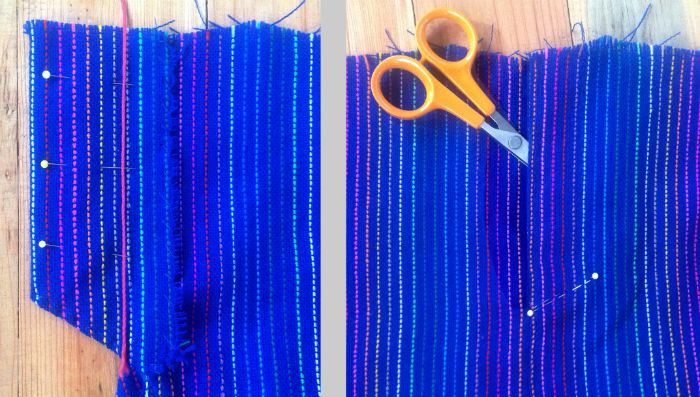
LEFT: The red string shows your vertical stitch line. RIGHT: The scissors are to help show where the fly opening is, and how it is closed neat and straight. The pins show where your final stitch will be.
Step 6) Add gathers
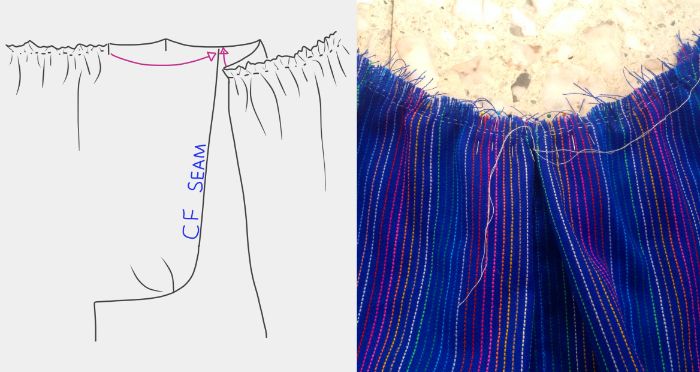
Using a basting stitch (the longest stitch setting on your machine), run two stitches along the waist line on each panel, from side seam to the first pleat notch. These stitches are 1/4" from the edge and 1/2" from the edge. Do this on all four panels. Don't do any back-stitching, as these stitches are temporary.
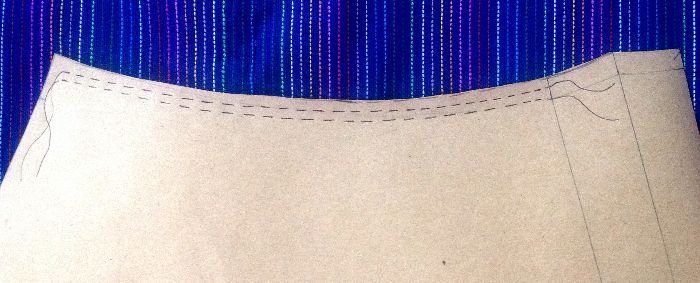
I drew this on the pattern paper so you can see easily.
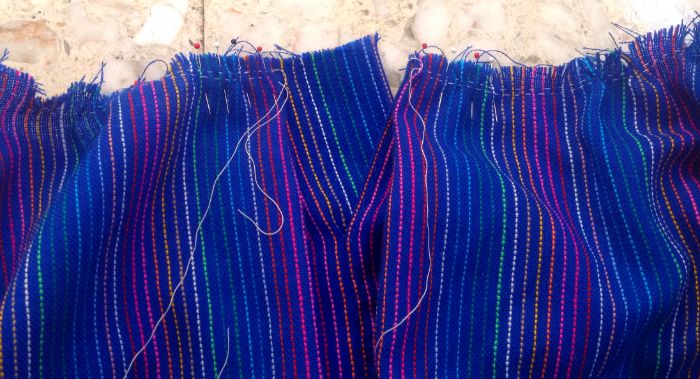
Tie all the loose end pairs together in knots on one side of the fabric. On the other side, tie only one end of each of the stitch pairs in a knot. To create your gathers, grab the unknotted thread ends evenly and securely with your fingers. Pull them with one hand, while gently sliding the fabric with the other hand. The knot at the other end prevents the threads from pulling through.
Pretty cool, huh?
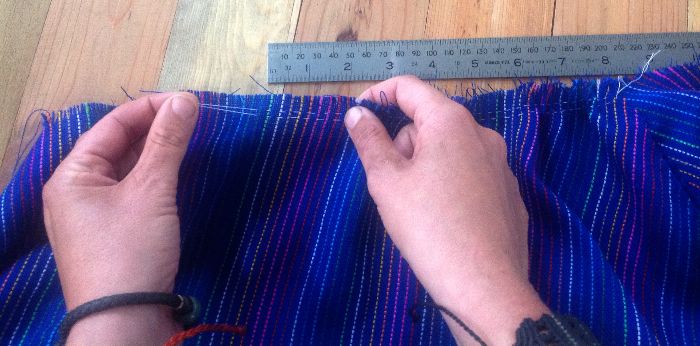
Evenly distribute the gathers as you pull the threads. Holding the waistline against the ruler, stop pulling when you have reached your quarter waist measurement (your waist measurement divided by 4). Now tie those last thread ends in a knot to hold the gathers in place. Push the gathers around as needed to get an even distribution.
Step 7) Create the pleats
Just fold each pleat at the waistline so that the notches match. Pin in place with 3 or 4 pins to help keep the gathers even.
It is difficult to show in a photo, so I drew a sketch.
On the side without the fly, the gathers will meet each other at the center seam. On the other side, the gathers will meet the edge of the top fly, and 2" from the edge of the bottom fly. Just match the notches.
Stitch in place 3/8" from the waist edge, with the gathers on the bottom so that the machine foot does not push them flat. Don't forget to change your setting back to normal stitch length!
Step 8) Attach the waistband
First fold your waistband in half, leaving 2" extended on one side. Cut a small notch on both sides of the fold.
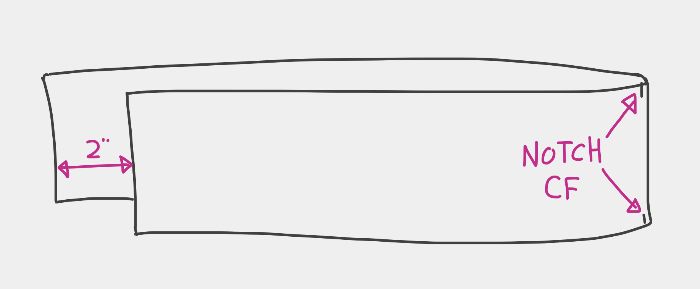
Lay the waistband face down on the inside of the garment, aligning the notch with the CF or CB (whichever does not have the opening). Make sure the end of the WB with the 2" extension is on the side that has the extended fly. Pin in place at the notch. Then pin in place at both ends, wrapping the 3/8" seam allowance to the front.

Wrapping the 3/8" seam allowance to the front.

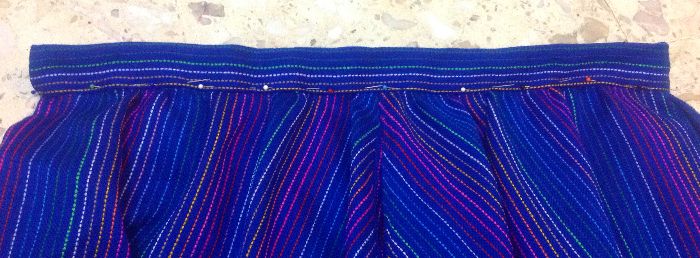
Then pin at the side seams. Your gathers may have loosened up a little, causing the skirt body to be looser than the waistband. Just pull the thread ends a little more until the waist line matches the WB. Place a pin every 1-2 inches, keeping the gathers evenly spaced.
Pro-Tip: insert your pins from the top down, so that the balls hover away from the fabric edge. This way, you can stitch on either side and the pins will always be visible and easy to pull out.
With the gathers down and the waistband on top, stitch 3/8" away from the edge around the entire waist. After stitching, carefully clip and pull out your gathering threads.
Flip the waistband up and press. Also press the folded seam allowance on each end. Now fold the top of the WB down 1/3rd. Press. Fold down again & pin to the body, with the pressed folded edge lined up with the stitchline.
| Flip the waistband up and press. Also press the folded seam allowance on each end. Now fold the top of the WB down 1/3rd. Press. Fold down again & pin to the body, with the pressed folded edge lined up with the stitch line. Once it is all pinned in place neatly, stitch it to the body. Stitch the end of the WB closed at the inner fly. Don't stitch the top fly end closed yet! |  |
Step 9) Stitch the legs
Turn inside out and match the rise seams. Pin in place and stitch. If you used the selvedge edge of the fabric here, there is no need to clean finish with overlock or zigzag!
Step 10) Attach the closure
There are so many options here... hook and eye, button & buttonhole, tie, button and loop... I won't explain them all but feel free to comment with questions. I will be using the button and loop method.
Choose your button. Make sure it is not too small... it should be at least half the height of the waistband. Shank buttons work best, which are the ones that sit up on a little stand, not the standard buttons with holes. Standard buttons are better for buttonholes and not loops, but if it is big enough it will work. I am using a toggle button that I made out of the same fabric as the skirt.
Choose your loop. Ribbon works well, or any kind of rope or cord. It should be 1/4" wide or less, and not too bulky, nor too skinny or string-like. You only need 2" or so to start with, depending on your button size.
Remember how we left the upper WB end unstitched? Insert one end of your loop into the waistband, at least ½" deep, and about ¼" from the top of the WB. Pin in place. Now pin the other end on top of the WB ¼" from the bottom of the WB, pinning as close to the end as possible.
| Push your button through the loop to check the size. If you can't get it through, you need to increase the size of the loop. If is slides through with lots of room to spare, you should make it smaller. The button should pass through easily but snuggly. Adjust and re-check by moving and re-pinning the loop end that you have not yet inserted. Once you've gotten your loop size right, trim the excess length from the loop end and insert. Pin in place and stitch the WB end closed. Stitch back and forth 3 or 4 times for added strength. |  |
To figure out the button placement, fully close the fly (pleat edges should meet) and pin in place. Using an ink pen or marker, pull the loop with the tip until it is fully stretched, then mark a dot on the WB beneath it.

Attach your button right on top of this dot, using at least 8 full circle passes with a double-threaded needle for strength. Knot well.

Step 11) Adjusting the length and hemming
First the fun part... try them on! They look great! Go ahead, give them a twirl!!
You probably cut these the length you wanted plus 1" seam allowance. But things often change once you look at your final product in the mirror. That is why I always save hemming for last! So check them out... too short? Too bad. Not a lot we can do about that. Go ahead and rock that flirty look, girl! Too long? Fold up the hem on one leg and put a few pins in place to find the length you want. Or just use the 1" hem that you built into the pattern.
One thing you should definitely check for is dipping at the side seams. Because the side seams are bias cut (the side seams are at an angle to the grain lines of the fabric), it is easy to stretch out. Despite our best efforts, sometimes the side seams stretch when stitching. Check the mirror... do the sides of your skirt look longer than the front and back? If so, you will need to trim a little extra off the sides to make it even. Put a pin in the side seam where you think it looks level with the front and back, then take the culottes off, lay flat on a table, and trim from the pined area to nothing, ending the trimming around the middle of each panel.

What your trimming might look like, if you find the sides are too long.
Once you have the length adjusted, stitch your hem. You can double fold back, or overlock/zigzag the raw edge and fold back once. In any case, due to the significant curve of the hem edge, you don't want your actual hem height to be more than 1/2". Trim as needed. Pin in place generously and stitch, being very careful not to stretch out!
Whew! How was that for a project? I hope you love the newest addition to your wardrobe. You are going to love responding to compliments with "thanks, I made them myself!" Store that pattern safely away in a folder and keep an eye out for more great fabrics you can use to make another pair! It will be much easier the 2nd time around :).
Whew! How was that for a project? I hope you love the newest addition to your wardrobe. You are going to love responding to compliments with "thanks, I made them myself!" Store that pattern safely away in a folder and keep an eye out for more great fabrics you can use to make another pair! It will be much easier the 2nd time around :).
 |  |
Were you brave enough to swim through this tutorial and make some culottes? Let me know how it went in the comments below! If you are super proud of your work, and you should be, post pics on the DesdeLejos Facebook page. I want to see them!
I will be in Cuba from April 9 - May 7… I will not have internet access at this time but I assure you I will reply to all comments when I return! I will also have a backpack tutorial for you :)
I will be in Cuba from April 9 - May 7… I will not have internet access at this time but I assure you I will reply to all comments when I return! I will also have a backpack tutorial for you :)