Pre-ramble: For a little back story, check out my earlier post, New Projects in the Works. This tutorial is in 3 parts and is very thorough. While I would not say it is for beginners, I think just about anyone with a little time and patience could tackle it. All you need to know is here, hopefully clearly explained and with lots of pictures. I have even included pro tips that I picked up from working in the industry! Just take it one step at a time and have fun!
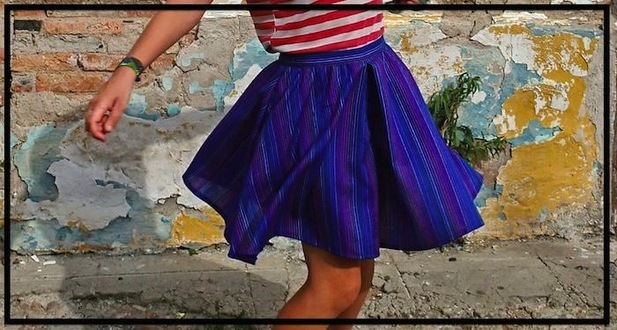
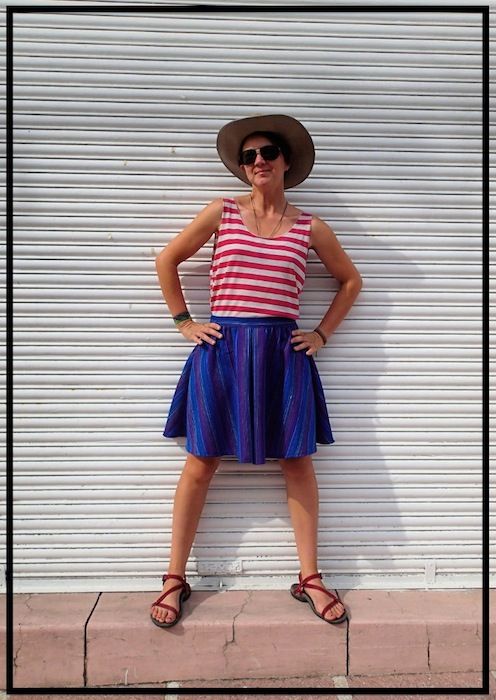 Looks like a skirt, doesn't it? 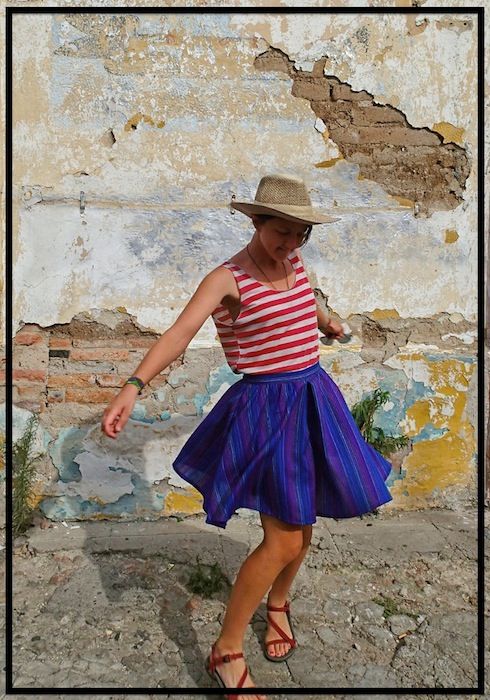 Perfect for twirling. | 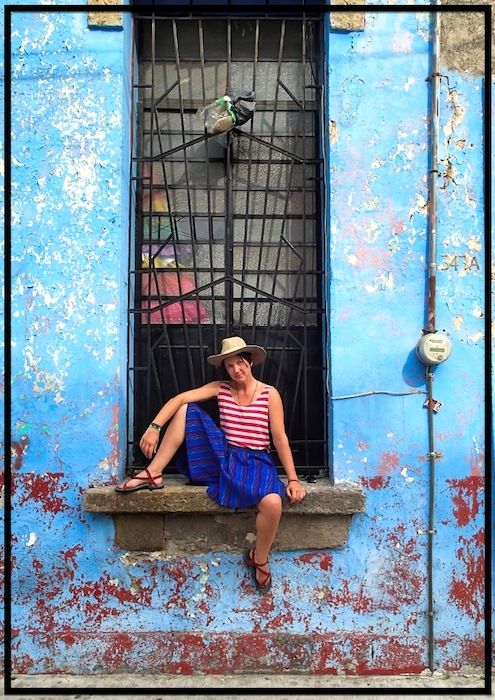 Well, it isn't!  And it even looks great with exposed brick! |
PArt 1 - Drafting the Pattern
I did a little online research and found a great draft over at Petit Main Sauvage. This is for a half-circle skirt with a pleat at the front and back, which hides the shorts and makes it look like a real skirt. They look great!
I wanted a slightly different look so I made some changes... adding gathers to the waist, adding side seam pockets, adding 1/2" to the back waistline to account for booty :). f you don't want gathers or pockets, those steps are easy to ignore. Lets get started!
STEP 1) Gather supplies. You will need:
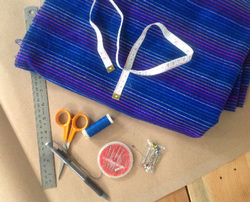 Not the exact supply list, but you get the idea. Took this photo when I thought this would be a 1-part tutorial, lol
 -pattern paper (newspaper, paper bags or any other scrap paper taped together will work. I am using brown packaging paper from a roll found at the Casa de Cyclista in Guadalajara, thanks guys!)
-scissors
-pencil
-tape
-tape measure or string
-straight ruler, the longer the better
-calculator
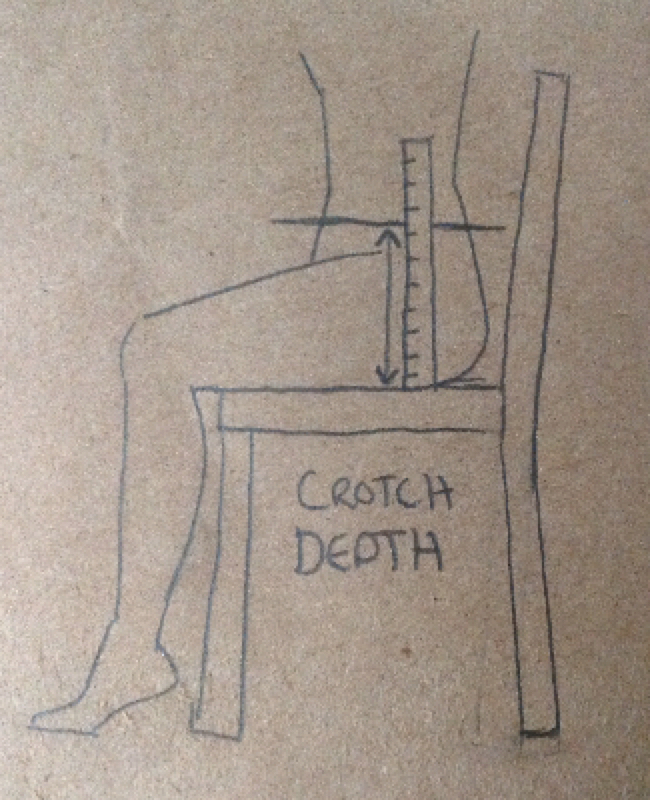
STEP 2) Take your measurements. Follow the instuctions below using measuring tape, or a string that does not stretch. You can measure the string with your straight ruler afterwards!
-Waist circumference: Measure gently around the smallest part of your waist. Don't measure too tightly or your skirt will squeeze you! If you want the skirt to fit lower, measure around your torso where you want the skirt to sit. Mine is 33", sitting just at the top of my hip bones.
Pro Tip #1: Mark this placement on your side body in washable ink or a pin in your clothes... it will really help as a reference point for the following measurements! We sometimes drew on the model in our fittings in the ol' office.
-Hip Circumference: Measure gently around the widest part of your hips/butt. Mark it. Mine is 37" (at the moment!).
-Hip Height: Measure the distance between your chosen waist placement and you hip placement. Just measure between the marks! Mine is 6".
-Crotch Depth: Measure yourself sitting down to get your crotch depth, or sitting height. While sitting straight in a flat chair, use the straight ruler to measure the side of your hip, from your waistline straight down to the chair. If you don't have a flat chair, you can use the floor or stairs. Make sure to measure from the waistline you chose when measuring your waist circumference. Mine is 7.5".
 |  |
Pro Tip #2: Always a good idea to re-measure yourself before any new project, if it has been many months since your last. You know how our bodies change!
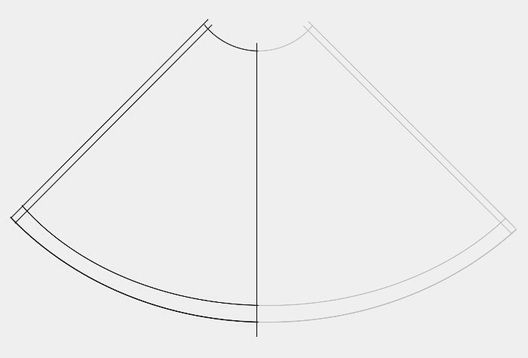
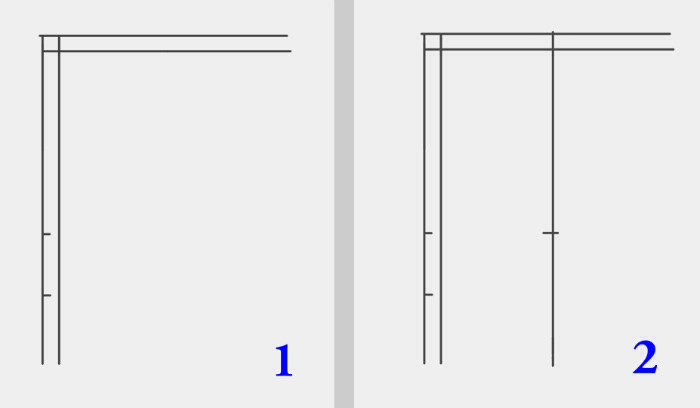
| STEP 3) Using pencil, draft the base pattern for a half-circle skirt. First, draw a perpendicular line straight up from the straight edge of the paper. For seam allowance, draw 2 more lines ⅜" from the edge of the paper and from the first line. I then follow the formula at Petit Main Sauvage, (waist) x 2 \ 6.28. My formula is 33 x 2 \ 6.28 = 10.5". Using a ruler placed at the inner corner of the right angle, dash in the waist radius by fanning out from one edge to the the other. |  |
Next, determine your skirt length. I start with a skirt length of 18" (top of knee for me). Draw the skirt hem using the same method as the waist, this time fanning out from the waistline.

Add 1" seam allowance below the hemline. You now have a basic half-circle skirt pattern. This piece is for the entire front of your skirt. We will be working in quarters after this.
STEP 4) Add the pleat. First, fold your pattern in half to determine your center front (CF) line. I don't like to waste too much paper, so I did not cut the whole thing out first, just the straight edges (side seams). Fold those edges to meet, and crease. Open your pattern and draw a line along the crease.
STEP 4) Add the pleat. First, fold your pattern in half to determine your center front (CF) line. I don't like to waste too much paper, so I did not cut the whole thing out first, just the straight edges (side seams). Fold those edges to meet, and crease. Open your pattern and draw a line along the crease.
I will now only be working with the left side. Erase the right side if the lines will be confusing to you.
I now draw the pleat. Since I am also going to add volume later in the way of gathers, I want to use a slightly shallower pleat width from what Petit Main Sauvage uses… 3" instead of 4".
3" will be a 1.5" deep pleat on each side when folded. Draw a parallel line 3" from the center line. Draw another parallel line in the middle of this. Add ⅜" seam allowance above the waistline.
3" will be a 1.5" deep pleat on each side when folded. Draw a parallel line 3" from the center line. Draw another parallel line in the middle of this. Add ⅜" seam allowance above the waistline.

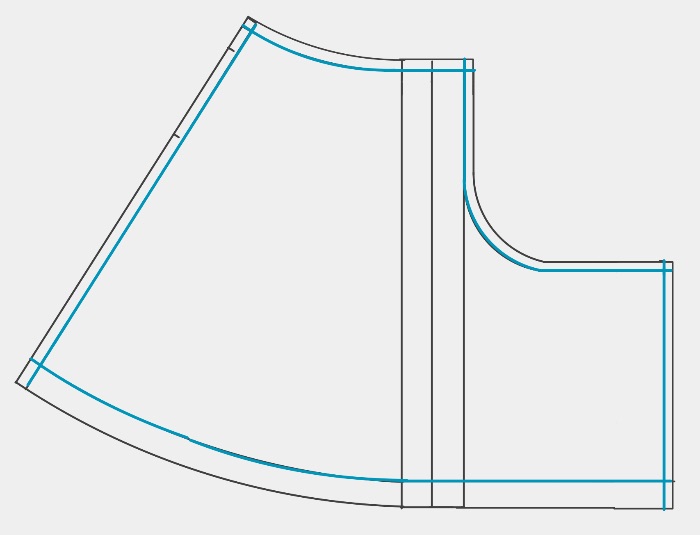
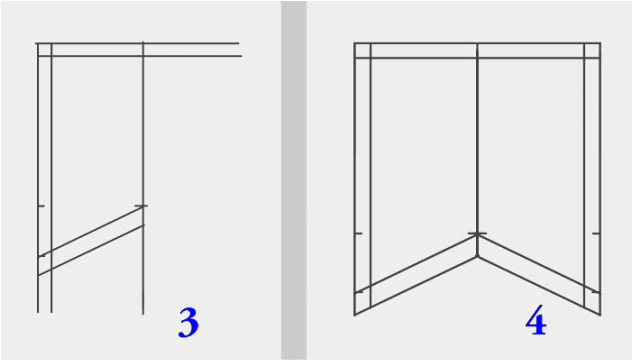
STEP 5) Add the legs of the shorts. Mark your hip height + 1/2" and your crotch depth +1" on the pleat edge, measuring straight down from the waistline (not the seam allowance line, which is above it). I added the extra length so that the culottes are real breezy in the crotch.
Now, another easy formula. Divide your hip measurement by 10", then add 1". My number here is 37 \ 10 + 1 = 4.7. Using this number, draw a straight line out from the crotch point (the lower mark). Measure the same distance out from the hem edge and box in your lines using right angles. Draw a gentle curve from the hip mark to the middle of the crotch line. Finish by adding ⅜" seam allowance around the outside of the crotch (rise) line and the leg. Then complete by extending the 1" hem seam allowance.
Now, another easy formula. Divide your hip measurement by 10", then add 1". My number here is 37 \ 10 + 1 = 4.7. Using this number, draw a straight line out from the crotch point (the lower mark). Measure the same distance out from the hem edge and box in your lines using right angles. Draw a gentle curve from the hip mark to the middle of the crotch line. Finish by adding ⅜" seam allowance around the outside of the crotch (rise) line and the leg. Then complete by extending the 1" hem seam allowance.

STEP 6) Add volume for gathers. I would like to add 50% more volume to the skirt at the waistline. This is just enough to give the appearance of gathers without adding a ton of volume. If you are using very lightweight and drapey fabric, you can add as much as 100% volume to create very dense gathers. This is not recommended for thicker fabrics because the gathers won't drape as well and will poof out at the hips. We don't want that!
I use the good ol' slash and spread method to add volume. Patternmaking 101, folks! First I will mark the pattern dividing the waistline into 3 parts, and the hem edge into 3 parts. This does not have to be perfectly even, just eye-ball it. If you are adding 75-100% more volume, you might want to divide into 4 parts for smoother volume distribution. Draw lines dividing your parts.
I use the good ol' slash and spread method to add volume. Patternmaking 101, folks! First I will mark the pattern dividing the waistline into 3 parts, and the hem edge into 3 parts. This does not have to be perfectly even, just eye-ball it. If you are adding 75-100% more volume, you might want to divide into 4 parts for smoother volume distribution. Draw lines dividing your parts.

Cut out your pattern. Make sure you have all of your seam allowances. Now it's slashing time! From the waist, cut along your division lines all the way down, stopping just short of the bottom edge of the pattern.
Since I want to add 50% more volume, I need a formula to figure this out. Divide your waist measurement by 4, to get the quarter waist measurement, which should be the waist length on this pattern peice. Then divide that number in half, to figure what 50% of the volume is. Divide again by 2 to see how much you need to spread each slash (divide by 3 here, if you have 3 slashes) So my formula would be 33 \ 4 = 8.25 \ 2 = 4.125 \ 2 = 2 (rounded, because I don't work with measurements under ⅛"). Placing another piece of paper under the waistline, spread each area the amount you figured, and tape in place. Make sure the whole pattern piece is smooth from top to bottom, no weird lumps.
Since I want to add 50% more volume, I need a formula to figure this out. Divide your waist measurement by 4, to get the quarter waist measurement, which should be the waist length on this pattern peice. Then divide that number in half, to figure what 50% of the volume is. Divide again by 2 to see how much you need to spread each slash (divide by 3 here, if you have 3 slashes) So my formula would be 33 \ 4 = 8.25 \ 2 = 4.125 \ 2 = 2 (rounded, because I don't work with measurements under ⅛"). Placing another piece of paper under the waistline, spread each area the amount you figured, and tape in place. Make sure the whole pattern piece is smooth from top to bottom, no weird lumps.

I don't have any tape, so I used pins.
Redraw your waistline to fill in the gaps. You will end up shaving a few "peaks" off the first pattern piece to get a smooth curve. If you are shaving more than 1/4" off, you should probably have used 3 slash lines instead of 2, but it will still work.

You now have your front leg pattern! If you want to be really neat, re-trace this onto a new piece of paper. I am lazy and hate wasting paper, so I just tape it down real nice and use it as is. You can also add more paper to the back to fill in the holes, an especially good idea near the hem of the skirt since that area is slashed close to the edge and could rip easily. I gotta find me some tape!
Pro Tip #3: Make notes on the pattern for easy reference, such as CF, SS (side seam), or any measurements you may need to reference again. It is also good to name your pattern and label each piece with the name, part, and how many pieces to cut out. For example, this would be Mex Culottes front leg x 2). When you start building more patterns, you don't want the pieces getting all mixed up! I like to store each project in it's own envelope.
STEP 7) Pockets! Mark a notch 1" down from the waistline at the SS. Mark another notch 5.5" below the first. This is for your pocket opening. Mark the same notches on the straight edge of a scrap piece of paper. But first draw a parallel line 3/8" from the straight edge for seam allowance.
Turn your skirt pattern upside down. Placing the scrap paper on top of the pattern, matching the notches. Put your hand on top of the paper as if it were inside a pocket and trace generously around your hand.

Smooth out your lines after tracing. A good standard pocket size is about 7.5" in total height and 5.5" wide at the widest part. Make it smaller if you want less bulk and don't care if your hand fits all the way inside. Make it larger if you want them really deep, but don't go too crazy or they will weigh down your skirt and you will have a hard time reaching your lip balm! I personally don't like to dangle my stash too low ;).
Draw 3/8" seam allowance around the rest of the pocket and cut out. Label it x4 because you will need to cut out 4 of these pieces in the fabric. Now you have a complete front panel and pocket!
Draw 3/8" seam allowance around the rest of the pocket and cut out. Label it x4 because you will need to cut out 4 of these pieces in the fabric. Now you have a complete front panel and pocket!
 |  |
STEP 8) Draft the back skirt. First, simply trace the front piece onto a new sheet of paper. Add the pocket notches and pleat lines, but not the seam allowances; you will add those at the end. You do not need to mark the slash lines.
I will be making only 2 changes to the back piece before cutting out. First, I want to add 1/2" in height at the CB waistline. This is because we all have a little booty back there. You know when short skirts hike in the back and dip in the front? I hate that. This is the simple solution!
I will be making only 2 changes to the back piece before cutting out. First, I want to add 1/2" in height at the CB waistline. This is because we all have a little booty back there. You know when short skirts hike in the back and dip in the front? I hate that. This is the simple solution!
| Extend all 3 pleat lines 1/2" above the waist. Redraw the waistline, blending to nothing at the side seam. |  |

Make a mark ¼" above the center of the waistline, if it will help you blend the new waistline.
Now, I extend the leg for a little more room for the tush. This time, I will use the formula 37 \ 5 - 1.25. Remember to substitute your own hip measurement here. I get 6.15"... I'm just gonna go ahead and round that down to 6. Add ⅜" for seam allowance. Extend your leg inseam to this final number (6 ⅜" for me), measured straight out from the edge of the pleat.

Erase the original waistline and leg inseam. Draw your seam allowances. They should all be drawn on the inside of your pattern lines because they were already built into the pattern. Now your back piece is finished!
STEP 9) Create an opening fly. I am going with a short 3.5" opening so that I can use just a single button and loop closure. A 3.5" fly adds 7" to the waist circumference when open. As long as this clears your hip measurement, you are golden. For me, 33" + 7" = 40"... plenty of clearance for my 37" hips. Do this math with your numbers to make sure you have enough room.
On a fresh piece of paper, draw a right with each line at least 6" long. Draw parallel lines ⅜" out for seam allowance. Mark a notch 3.5" down from the waistline (the 2nd line from the top). Mark another notch 1.5" below the first. Draw a parallel line 2" from the CF seam (the 2nd line from the left). Mark a notch 3.5" down on this new line.
On a fresh piece of paper, draw a right with each line at least 6" long. Draw parallel lines ⅜" out for seam allowance. Mark a notch 3.5" down from the waistline (the 2nd line from the top). Mark another notch 1.5" below the first. Draw a parallel line 2" from the CF seam (the 2nd line from the left). Mark a notch 3.5" down on this new line.
Draw a diagonal line connecting the lower notches. Draw seam allowance ⅜" below that. Fold your paper in half along the single line and cut out for a mirror image. Draw your notches and seam allowances on the other side.
In some cases, it is appropriate to use this piece separately, sewing it on. In this case, it is fine to add it as an extension from the pattern piece, so all you have to do is fold the fly back, rather than sew it on. To do that, first decide if you want the skirt opening at at the front or the back. Since there will be a lot of fabric at the front already because of the pleats, I don't want to add more bulk to my stomach area, so I will be placing the closure at the back. However, a front location would be easier for putting the culottes on and buttoning. You decide which is best for you.
To add the fly to the pattern, just overlap the rise seam lines at the waist and tape in place!
To add the fly to the pattern, just overlap the rise seam lines at the waist and tape in place!

Overlap the red lines and tape in place.
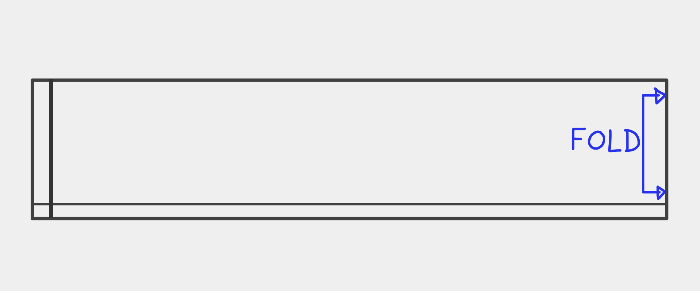
STEP 10) Create a waistband. 1.25" is a pretty good height for one, but you could make it narrower. If you want it wider, it would require some shaping that I will not cover here, but feel free to ask! A waistband usually needs some sort of stiffener inside so it is not floppy. You could use interfacing, but I am going to use self fabric, by tripling the layers. So the height of my pattern will be 1.25 x 3 = 3.75". The total length of the waistband will be your waist measurement + 2" for the fly. For me that is 33 + 2 = 35".
To keep my pattern piece from being super long, I divide this number in half and remember that one end of the pattern needs to be on a folded edge of fabric, so you cut it out double. Always mark your pattern pieces if there is a folded edge, so you don't forget! Add ⅜" seam allowance around the outside of only 2 sides of the pattern, as shown below. So my final pattern piece is 17.5" x 3.75", + ⅜" seam allowance on one side and one end.
To keep my pattern piece from being super long, I divide this number in half and remember that one end of the pattern needs to be on a folded edge of fabric, so you cut it out double. Always mark your pattern pieces if there is a folded edge, so you don't forget! Add ⅜" seam allowance around the outside of only 2 sides of the pattern, as shown below. So my final pattern piece is 17.5" x 3.75", + ⅜" seam allowance on one side and one end.
Now you have all of your pattern pieces! Here is the second part, Choosing Your Fabric and Cutting.
If you want to be notified right away when part 3 posted, and want to stay informed about whatever else I may be getting into (I try to only post the headiest sh*t), like the DesdeLejos Facebook group and/or sign up for blog updates right to your email! Use the form in the sidebar to subscribe!
If you want to be notified right away when part 3 posted, and want to stay informed about whatever else I may be getting into (I try to only post the headiest sh*t), like the DesdeLejos Facebook group and/or sign up for blog updates right to your email! Use the form in the sidebar to subscribe!

I made these culottes without a sewing machine while traveling in Mexico. What's your excuse? :)